


Action buttons and action settings:
With help of action buttons you can
create a link between slides. (For example when you r viewing the last slide,
you can go to the first slide again by putting the action button.)
·
Click
on slide show menu
·
Click
on action button
·
Select
a button according to your requirement and drag the mouse to draw it in the
slide.
·
The
action settings dialogue appears. You can select any tab mouse click or mouse
over, which will work, according to your selection. (For example select the
mouse click.)
·
Automatically
hyperlink to option get selected
·
Now
from the list select any option as required (for example to move to the next
slide select from the list next slide )
·
Then
click ok.
·
This
way you can link with the slides, document, web page etc.
·
Using
action settings you can run a program also.
·
You
can either drop an action button or you can select an object. (For example you
can select a picture).
·
When
you are linking with the action buttons, the action setting dialogue comes
automatically but when you are going to link a program with an object select it
and open action settings from the slide show menu.
·
Click
on run program option, click on browse.
·
Select
any program(for example select notepad)
·
Then
click ok and again click ok.
·
Now
when you are viewing the show click on the objects or button where you have set
the program. The program starts running.
·
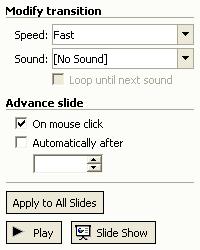
To
play sounds check the play sound check box from the action settings dialogue
and then select any sound from the list. Now when you are viewing the show
click on the objects or button where you have set the sound. Then it starts
playing the sound.
SET UP SHOW:
·
Open
setup shows from slide show menu.
·
Here
you can change the show type according to your requirement (For ex….- If you
check the option loop continuously until esc,than the view show will continue
till you press Esc Button.)
·
From
the slides you can select all to set for all slides or you can select the
slides by mentioning the starting number and the end number in from and to box
.
·
From
Advance slides you can set the show manually or you select the next option
using timings, if present to run the view show with timings.
·
When
you have done the entire setting click OK.